Review January assignment "Composite"
February assignment "Artificial light Portrait"
Our presentation by Jim Harmer
Lighting Your Photography: Inexpensive and simple
techniques to transform any scene
It seems that all photographers pass through many different
phases as we seek to become better photographers. I am certain that I
have many phases to continue to struggle with as I continue to learn
photography, but I have taught enough photography students through my website
to see that there are certainly some difficulties that nearly all photographers
struggle with in the beginning and intermediate stages.
As photographers first begin learning, they typically
struggle for 6 months to a year just feeling comfortable with their cameras.
At that point, their photos are mostly free of technical problems such as
blurriness, incorrect exposure, etc. However, their photos still don't
have the professional "look" that they want. This is when they
often feel frustrated with their photography and many photographers quit
learning.

In most of these cases, the missing element in the photos
from these photographers is
quality lighting. I learned this
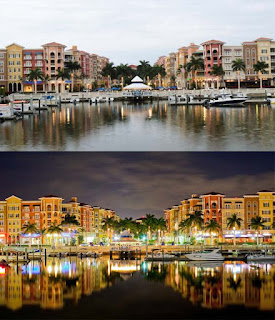
lesson while photographing a beach location in Southwest Florida. I drove past a gorgeous building on the bay many times. The
building and the location were so beautiful that I knew there was a picture
there, but I wasn't quite sure how to capture it in a photo. No camera
setting, composition, or anything else seemed to do the building justice.
Then, one day it hit me to shoot the same location at night with the city
lights turned on. I returned to the same location and took a photo that I
have sold many many times and a 12 foot long print of this photo is now on
display inside the office of the builder of this building.
Because the natural light so dramatically affects the
lighting of the landscape, it is easy for landscape photographer to appreciate
the difference between good and poor lighting, but the same is not always true
of portrait photographers. Portrait photographers are often so distracted
with posing and communicating with the subject that they fail to properly
address the lighting. I groan when I hear photographers describe
themselves as "natural light photographers" merely as an excuse for
not learning proper lighting.
This is an example of how lighting
can easily change a portrait photo. The "before" photo is technically
correct, but the resulting photo is poor without paying close attention to
the lighting. The difference between the photos is dramatic even though
the camera settings and composition is identical. The only difference is
that one photo uses flash photography, and the other doesn't.
Many photographers are scared away from flash photography
because they have seen the nearly unconscionable prices of a Canon or Nikon
speedlight and can't imagine investing thousands of dollars to just buy a basic
lighting kit. I've been there, trust me. Seeing so many
photographers failing to learn lighting just because of the high prices of the
equipment, I set out on a mission to find less expensive alternatives. I
spent several thousands of dollars buying and testing countless flash
photography products to find a way that
any photographer can learn
lighting without getting a second mortgage. A gear list of the best (and
most inexpensive) equipment I found can be accessed here:
http://improvephotography.com/jims-recommended-photography-gear/recommended-flash-photography-kits/
In this presentation, I'd like to present to you a simple
and inexpensive way to get started in flash photography. I'll also give
you a crash course on how to set up your flash photography equipment, but more
than anything else, I want to teach 4 principles of lighting that will
transform any scene by controlling the light.

 Macro photography is geared towards close-up work with small
subjects. Photographing the miniature world can be fascinating as it
opens a whole new plane of discovery. Best of all, it can be done anywhere and anytime - whether
in your backyard garden or during a rainy day up in the mountains.
This presentation will be
divided into three parts. First, we’ll discuss the types of equipment
needed for macro shooting. For example, what exactly is a macro lens and
why can’t a regular lens be used for macro work? What kind of tripod
should you look for? How
do you use extension tubes and external lighting? Second, we’ll discuss technical
details of shooting in macro mode as
well as common pitfalls to look out for. There are numerous tips and tricks that can make
life much easier. Third,
we’ll discuss different
applications of macro photography as well as what makes for attractive
compositions.


